Shademp, BrutalAl, and GlitterBerri comment on the differences between Final Fantasy VII prerelease screenshots and the final version of the game found on RPGamer. Special thanks to caitshiznit for bringing these pictures to our attention! Click the map names to see the prerenders from the final version.
OVERWORLD/MAP DISCOVERIES


-Hard to tell anything from this picture, but the area around Bone Village/the Cetra capital seems a lot flatter than it should be. There is a long stretch of mountain missing and the pit should also be visible.


-Cloud had his arms pressed to his sides and *possibly* could walk and not just run on the overworld.
-It is interesting how the majority of these photos show “Demo Cloud” (the short version of him, controllable in the 1996 Demo), even scenes which are in all other ways near-identical with the finished product. I can’t say for sure, but it would not surprise me if the change to Tall Cloud was done very late in production.
-Texture transitions (mountain-grassland, marshland-grassland) were made smoother for the final game.


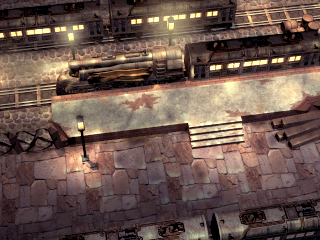
-The group of buldings to the upper left is the regular Rocket Town (with the top left path being the one that normally leads to the rocket), the rest of the buldings are unseen in the final product.
MOUNTAINS:

-Beta version.

-Finished version.
MARSHLANDS:

-Beta version.

-Finished version.

-A house accessible only via airship or Chocobo used to exist in between Kalm and Chocobo Farm. COOL!
-World Map pointed out Gongaga, possibly the lone house in between Kalm and Chocobo Farm, as well as some point northeast of Fort Condor (Mythril Mines entrance?)

-The finished mini-map.

-Three lone Chocobo tracks. The tracks are never this short in the game!
FIELD DISCOVERIES SUMMARY
ANCNT1 (Forgotten City):


-Aeris is facing left here when she is praying, however in the finished game she is facing the altar steps.
-Cloud is standing on the steps which is something we never see in-game. Upon reaching the platform he is immediately transported to ANCNT2 (the altar close-up).
-Ever noticed in the Aeris Death FMV that despite that she’s supposed to face the altar steps and then get killed, when the Materia falls BACK it falls down the altar steps? COMPLETE OPPOSITE DIRECTION OF WHERE SHE WAS SUPPOSED TO BE PRAYING! However, in this earlier version she was praying to the left. It is more conceivable then that the Materia fell at an angle, then down the steps. That is, unless we’re supposed to assume that the Materia bounced here and there before it finally fell down the steps.

-No stairs of light in the background. A normal stair at the right section is missing too.
BLIN61 (Shinra HQ Floor 61):

-The large tree does not look as natural in this early version.
-The glow below each pine tree is much more apparent in the finished game.
BLIN68_2 (Shinra HQ Floor 68):

-Is this a joke or was RedXIII’s name supposed to be spelled with Arabic Numerals rather than Roman? Maybe, maybe not. Instances of RedXIII being written “Red 13” can also be found in the debug text.
COLOIN2 (Gold Saucer, Battle Square):

-This escape scene is similar to the finished thing. However, the guy at the lower right who should be Dio looks way thinner and actually HAS A SHIRT ON! His hair style is almost the same though.
DATIAO_1 (Da-Chao Statues):
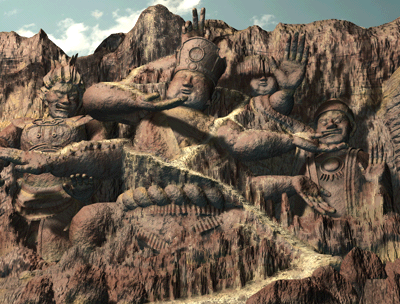

-The surface below the rightmost statue looks more rugged in the finished game. To me the difference seems obvious, but maybe I am fooling myself.
DATIAO_2 (Da-Chao Statues):

-This version of the field show marks of deterioration left of the big face’s cheek. These marks are not there in the finished game.
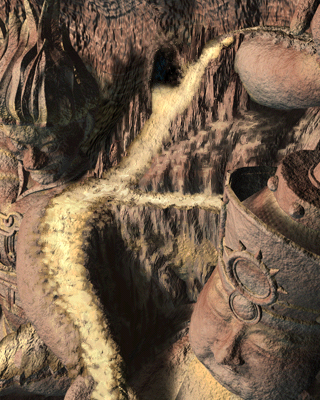
DATIAO_4 (Da-Chao Statues):

-The hole in the wall is more covered up in the finished game.
DATIAO_5 (Da-Chao Statues):

-It’s much more ambiguous in this beta field as to whether or not there is a cave entrance to the left. The rock surface to the right of Cloud looks different than the one in the final game.
ELM (Kalm):

-The group never gathers like this in the town centre, much less appears outdoors in Kalm all at the same time.

-That’s weird…why are you controlling RedXIII? That never happens at any point in the game.
FARM (Chocobo Farm):


-Houses are a lot taller here.
-Here we see tree branches and leaves obscuring the right section of the field. This is not present in the released game.
FRCYO (Chocobo Farm, Stables):

-Much lighter color scheme than in finished version.
FRMIN (Chocobo Farm, Inn):

-The shading is slightly different.
-The two doors are never closed in the released game although animations for them do exist.
GAMES_1 (Gold Saucer, Wonder Square):
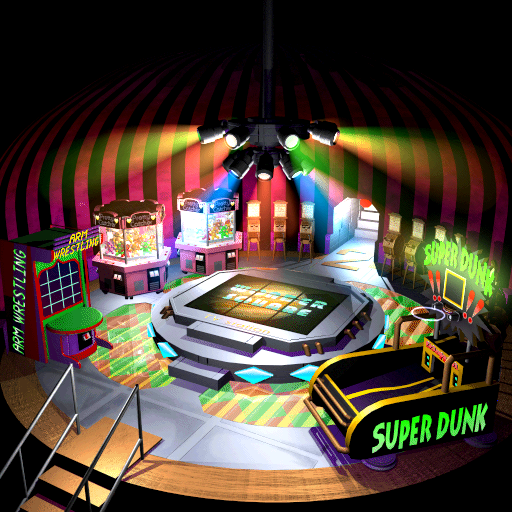

-The Basketball Minigame at the lower right looks different! Compare with GAMES_1 to see changed design and color scheme.
JET (Gold Saucer, Speed Square):

-At no point in the game is more than one Chocobo mascot walking around here.
JTEMPL (Ancient Temple):

-The fog is lacking at some small places.
-The color tone may have been changed for final version, or the screen is just badly scanned.
-Notice that Cloud has his arms straight down. Either this is a VERY OLD screen, where the arms of all characters were straight down instead of at an angle, or he is like that for debugging purposes (some characters in the debug rooms have their arms straight down).
MDS5_1 (Midgar, Sector 5):


-This earlier version of the field does not contain the beam of light from the upper right area, or the blue lights present here and there in the finished game.
MDS5_3 (Midgar, Sector 5):

-The upper right section of this field is cut from the final version. Compare with MDS5_3 to see exactly what has been cut.
MDS5_4 (Midgar, Sector 5):

-Cloud never stands still on that piece of rubble. He stops first after the next jump.
-The front row background looks the same as in finished game aside from a portion of the field to the right is not visible.

-A snapshot from the finished game for comparison. The back row background is positioned differently in relation to the front row background, as you can see in the snapshot above. It can not be discerned if the back row was changed.

-The back row background.
MDS6_1 (Midgar, Sector 6):

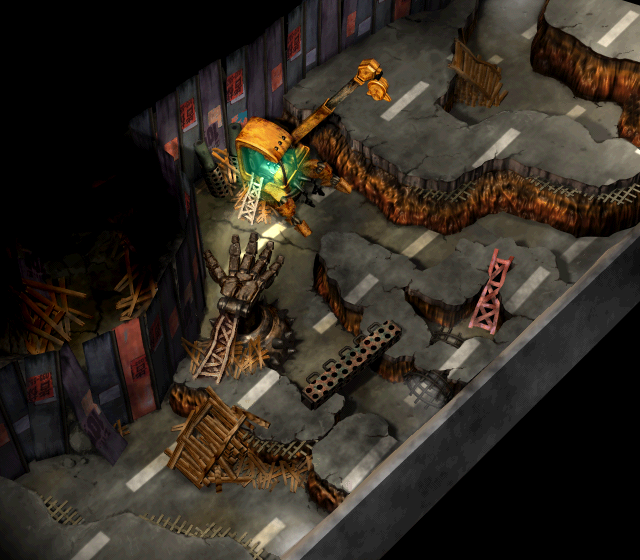
-The fingers of the mechanical hand at the lower left are white at some segments. The segments are all brown in the released game.
-The 3D-object supposed to lead to the upper platform is not present.
-I speculate that the yellow crane was supposed to be your way to the platform.

-A comparison shot showing the now-inaccessible area that was hidden in the final map. Possibly a passage to another field.
MDS6_2 (Midgar, Sector 6):

-The red doorway was replaced with 3D-objects acting as doors in the finished game.
MDS7 (Sector 7 Slums):


-These screens show the well-known hidden scene with Tifa and Cloud.

-There is a blue glow here and there which is not present in the finished game. Notice especially the blue light leading to the next area to the right.
MDS7_W1 (Sector 7 Weapon Shop):

-The yellow lights in the upper right corner do not exist in the finished game.
MDS7PB_1 (Seventh Heaven, AVALANCHE HQ):

-Tifa is looking at the television. She never does this in-game. It may elude to this piece of unused text:
Tifa
“Will you please come back?
Ah, wait. Please wait.”
“The president of Shinra
is going to read a statement.”
-Newsreader looks like a normal human. Replaced with Lego Newsreader animation, but the animation for this newsreader is never used.

-The unused animation.

-The TV screen here is never used.
-The Pinball Machine is part of the background and NOT a 3D object. It is conceivable that the developers planned to use background animations for the Pinball Machine’s descent and ascent, but changed it to a 3D-object for
simplicity’s sake.
MDS7PB_2 (Seventh Heaven, AVALANCHE HQ Basement):


-Marlene never lies down like that on the box. She always sits on the box.
-Newsreader is a photo of a normal human. Replaced with Lego Newsreader in finished game.

The Lego newsreader.

-Yet another version of the AVALANCHE hideout.
-The television screen here does not exist in the game. Here it says “CNM” rather than “SIN”.
-The glow from the TV reflects on various parts of the background.
MDS7ST1 (Sector 7 Train Graveyard):

-Two tin barrels (containing items) present in the finished game are not seen here.
MDS7ST2 (Sector 7 Train Graveyard):

-There is supposed to be a tin barrel at the lower left. With MDS7ST1 as another example, at some point the tin barrels must have been animations rather than a fixed part of the backgrounds.
MDS7ST3 (Sector 7 Train Station):

-The open area is smaller and the train has not arrived. In the finished game the train is always there, as part of the background.
MRKT1 (Wall Market):

-Earlier version of this field. The sign above the gym is in English! :O Well, partially.
MRKT2 (Wall Market):

-The “South” sign has a different color scheme. In the finished game the text is yellow instead of green. The blue part was replaced with green.

-The smoke/steam looks different. Here the smoke looks more like a cloud while the finished game shows a pillar of smoke.
NCOIN1 (North Corel Tent):

-This background contains wooden seats; all of them are removed in the finished game.
NVDUN2 (Mt. Nibel Cave):


-The cave looks more toxic with its stronger green color. Lighter ‘mint’ green in released game.
NVDUN3 (Mt. Nibel, Materia Fountain):

-Beta version of the NVDUN3 field. The tree, the cave entrance, the Mako Fountain are the same but the area is darker and feels more like a closed area.
NVMKIN1 (Mt. Nibel Reactor, Interior):

-Older version of Nibel Reactor background. Notice the cables at the upper right, and the shut door to the next room. Neither of these are there in the finished game. (There’s not even a “Closed door”/”Open door” animation in there.)
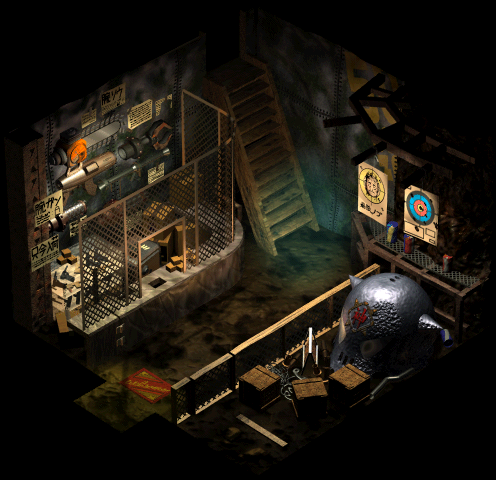
PILLAR_2 (Sector 7 Supporting Pillar):

-Cloud appears much smaller here than usual. The perspective was changed for the released game so Cloud appears larger.
RCKTBAS2 (Rocket Town, Rocket):
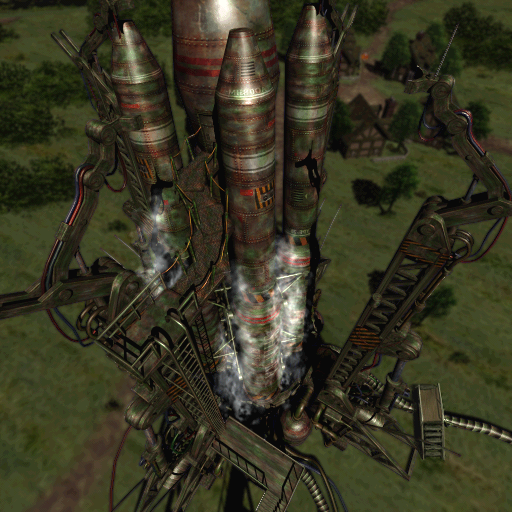

-There is no scene in the game, like above, of meeting Cid just outside the Rocket, with a mechanic by his side. In the game you find Cid inside the rocket. No mechanic is there. The dialogue, “My parents named me Cid. But everyone calls me the captain,” indicates that this is Cloud and Cid’s first meeting.
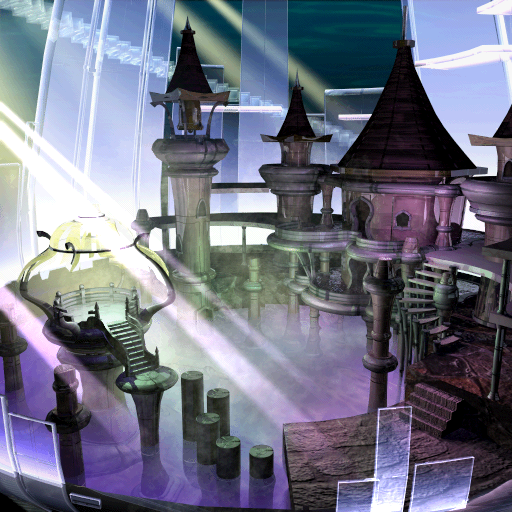
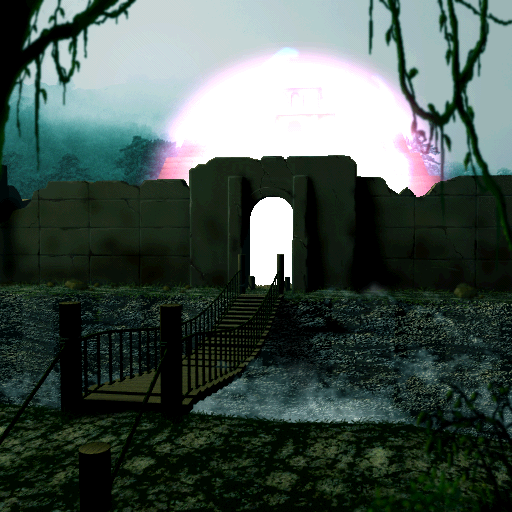
WHITEIN (Forgotten City):
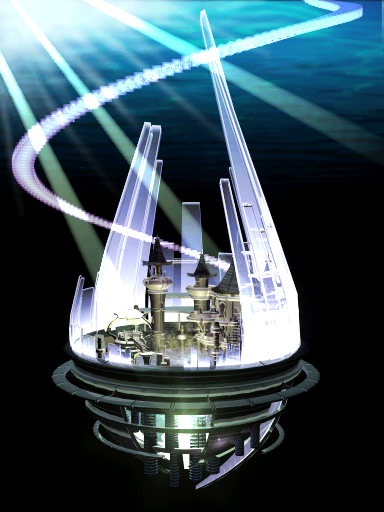

-Lacks the “Stairs of light” descending to the floating structure.
-Beams of light from upper left corner are a bit weaker here.
-More lights are on at the very bottom of the floating city than in the finished game.
UNUSED BACKGROUND


-An unused map from Gaea’s cliff that doesn’t exist in the final game. Only seen in old footage.
JUNON


-The purple Shin-Ra posters are completely removed in the finished game, both from CG sequences and normal backgrounds. Only the red Rufus posters remain. No equivalent field file exists, as these are CG shots.
MATERIA
AQUA BREATH:

-The camera never pans this far away and to this height during this magic animation. In fact I can’t think of any animation that causes the camera to pan this far away.
BREAK:

-I can almost swear that this version of Break shows a much larger stone, but I’m afraid I can’t be 100% sure even when I compare this image and the finished spell.
SLAPSHOT:

-This screenshot depicts the deleted Materia, “MIDAREUCHI” (Chaos Strike) replacing the Attack option. There is a line amidst the debug text that references this Materia. The official translation of the attack name is “Slapshot”.
http://www.rpgamer.com/games/ff/ff7/graphics/battle/ff7bat16.jpg
-Here we see MIDAREUCHI actually in use, perhaps?
BATTLES

-Action Text Box (top of screen) has greater width but smaller height in final version.
-Old Barret model is used, at least (let’s call it “Demo Barret” as I recognize him -from the demo). Demo Cloud and Demo Aerith probably as well.
-Player Action Text Box is placed slightly more to the left than final version.

-Slash after MP shouldn’t be there.

-I take back what I said about the Player Action Text Box before. It was just narrower on the right side. In the above screenshot it has received its normal width and covers up the “Barrier” gauges more. Note that the MP slashes remain.

-The Manipulate menu has a scrollbar, which is not normally present. Enemies, at least the majority of them, have more than 3 attacks. But when using Manipulate, you either have 1, 2 or 3 attacks. Some of these attacks the monsters will never use, but they are nevertheless in their attack repertoire. You never have more than three options so there’s no need to toggle down.
-In the final version enemies blink blue and turn their backs when under Manipulate. Here the enemy is still facing the party and there is no sign of the blue blinking (although the photo may just have been taken at the lower end of that animation). Notice also that the yellow pointer which usually hovers above your party members hovers above the manipulated enemy in this shot; something it never does in the finished game.
-Eligor (the enemy on the horse-thingy) is never in a battle with the Ghost enemy. Eligor always appears alone.

-The characters have a more dark green tone in the final version when turned into frogs.

-Definitely demo Cloud. Notice the MP slashes, and the size of the Player Command Box (it’s the natural size).


-The MP value and slashes are placed differently.

-Notice how Barret and Cloud are facing different directions. In the 1996 demo, characters will be facing the same direction as they last attacked. Even during the fanfare they will be facing that direction. In the final game the characters are always corrected to be facing one direction only, when not attacking.

-Cloud is named CHRIS and Aeris is named GIRL♥ for some reason. And it’s the Japanese version. I have no idea.
ENEMIES

-The Moth Slasher is not that white in the final version. More grey tone. The human enemies to its left and right have white armor for their arms and legs; in the actual game they are, again, dark.

-Those flying enemies are never fought in a forest area.
-The Whole Eaters (front enemies) are never encountered in a battle arena/background of this kind, nor are they grouped with the back row enemies.

-Crabs are never fought in a forest area.

-Nor do they ever appear in groups of 5.

-These Ancient Dragon enemies hover higher in the air and don’t look nearly as “bent” in the final game.

-Dual Horns are never fought in a forest area. (Geez, they must have used the forest area ALOT in the early testing.)
VEHICLES

-Tifa doesn’t wear that attire. Her hair is wider and she wears a purple dress when standing on that wagon.

-Just a random bit of trivia, but the artwork of the Highwind is re-used in Crisis Core.

-It’s viewable on 3rd Shin-Ra floor and is a tiny bit more compressed the Crisis Core artwork is.
A final note is that no NPCs seem to be visible, possibly suggesting these screenshots come from a very early test version of the game and that they hadn’t been implemented yet.
Great analysis everyone, I still couldn’t believe my eyes when I came across these screen shots on rpgamer.com. I still think there is a playable demo of these battle-scenes out there somewhere, it looks like the same build used in the Tobal No. 1 demo, I’d guess these screens where shot in house at one of Square’s locations running the demo or it was promotional and sent out to magazine reviewers like Gamefan. Anyway, if it did exist I’d imagine it’s in Square Enix’s hands now.
Anyway great job, and I’m happy my find has been put to good use!
mate ne homos! BYE BYE! (XainRM)
Hey again, sorry for the delay in answering you. I just finished finals, so I’ll have more free time now. Since I can’t reply to your message on YouTube as you closed your account, I’ll post it here… I didn’t see you on MSN, unfortunately! I was looking forward to talking with you. My friend took a look at the other screenshots you scanned and uploaded and found a few changes, as well as reliable ways to date the other screenshots we have based on minor changes made in development, like the slash after the MP value. I’ve been collecting his notes as he goes over them, but he’s a bit busy too. Expect to see another update about them soon! Glad you enjoyed the article we put together. =) Thanks so much for providing us with those!
What’s with the odd comment…?
Pingback: BerriBlue » Map Analysis Part 5
Pingback: Glitterberri » Map Analysis Part 5
Does anyone know where i can obtain an ISO or a disc of these early builds?
I’d kill to play an early alpha of FF7 :p
If there on a disc i wouldnt think they’d be playable on a regular playstation,
also you should see this http://www.youtube.com/watch?v=vfEgLkhzg_U
shows the guys working on FF7 😉
Look at those ghetto computers! That’s a pretty neat video. 🙂
Sorry, I don’t think an early build has ever been leaked. The earliest we have is the Tobal demo. I’d definitely be all over it if one appeared, though. Luckily the final game itself has lots of early, unused content.
What’s the meaning of those “GF” on screenshots?